
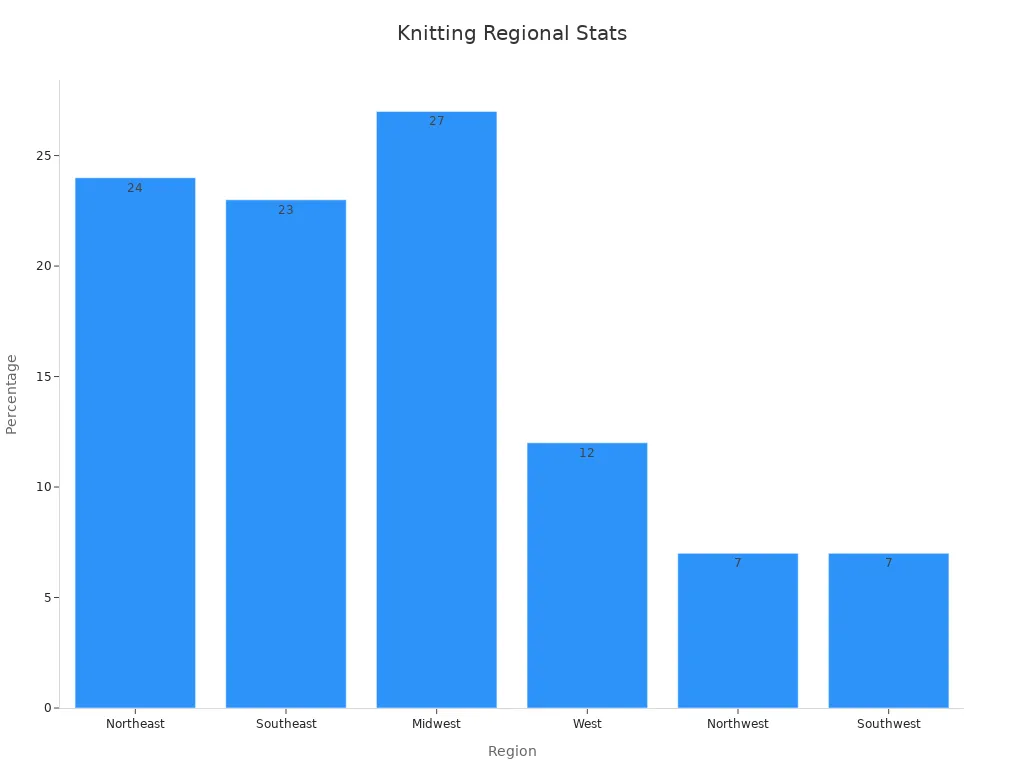
Mastering Knitting lets you create a range of projects, from chunky blankets to delicate baby clothes. You need to focus on key skills like choosing the right needles, using the correct cast-on methods, and understanding yarn types. Selecting the best tools matters—51% of knitters buy yarn monthly, and 85% choose stores for color variety. The largest age group for knitting is 35-54 (36%).
Tip: Measuring gauge, such as 4 stitches per inch with US size 8 needles, helps you achieve the right size and texture for any project.
Project Popularity | Percentage (%) |
|---|---|
Scarves | 86 |
Hats | 79 |
Baby Blankets | 64 |
Afghans/Throws | 60 |
Mastering Knitting skills gives you control over project results, whether you knit for daily relaxation or special gifts.
Key Takeaways
Choose the right needles and yarn to match your project for better results and comfort.
Master basic skills like cast-on methods and garter stitch to build confidence and create neat, flat fabrics.
Use big needles and chunky yarn for quick, cozy blankets, and small needles with double-pointed needles for soft, seamless baby clothes.
Fix mistakes early to improve your knitting and enjoy better finished projects.
Explore free tutorials, join knitting groups, and practice advanced techniques to keep learning and stay inspired.
Mastering Knitting Basics
Needle Types and Sizes
Selecting the correct knitting needles is crucial for the success of any project. Beyond just shape, the material and size of your needles significantly impact the final look, feel, and even your knitting experience.
Understanding Needle Types and Their Uses
Straight Needles: These classic needles, typically sold in pairs, are ideal for flat projects like scarves, dishcloths, and individual sweater pieces. Their straightforward design makes them excellent for beginners.
Circular Needles: Comprising two needle tips connected by a flexible cable, circular needles are incredibly versatile. They are essential for knitting larger items in the round, such as blankets, sweaters, and even hats (when the circumference is large enough). They can also be used for flat projects, holding a greater number of stitches than straight needles.
Double-Pointed Needles (DPNs): Usually sold in sets of four or five, DPNs are short, pointed needles used to knit small circumferences in the round, such as socks, baby hats, and sleeves. The stitches are distributed across several needles, with one needle used to knit from the others.
The Impact of Needle Material
The material of your knitting needles plays a significant role in your knitting speed, stitch definition, and overall comfort.
Bamboo/Wood Needles:
Pros: Offer a good grip, preventing stitches from slipping off easily. They are warm to the touch, lightweight, and quieter than metal needles. Excellent for beginners or for use with slippery yarns like silk or rayon.
Cons: Can be less durable than metal, sometimes prone to snapping if too much pressure is applied, and may not be as fast for experienced knitters.
Metal Needles (Aluminum, Brass, Steel):
Pros: Known for their slick, smooth surface, allowing stitches to glide quickly and effortlessly. This makes them ideal for speed knitting. They are highly durable and come in a wide range of sizes.
Cons: Can be cold to the touch and produce a metallic clicking sound. Stitches can slip off easily, which might be challenging for beginners or when working with very slick yarns.
Plastic Needles:
Pros: Very lightweight and affordable, making them a great entry-point for new knitters. They are flexible and often come in vibrant colors.
Cons: Can be more flexible than other materials, potentially leading to less precise stitch formation. Some lower-quality plastic needles may also snag yarn.
Why Needle Size Matters So Much
Needle size directly impacts the gauge (the number of stitches and rows per inch) of your knitting, which in turn affects the fabric’s look and feel.
Large Needles (e.g., US size 15 or 17 / 10.0mm or 12.75mm): Create big, loose stitches, resulting in a soft, drapey, and often airy fabric. These are perfect for chunky knit blankets, cozy scarves, and quick projects where a looser gauge is desired.
Small Needles (e.g., US size 2 or 3 / 2.75mm or 3.25mm): Produce tight, neat stitches, creating a dense and structured fabric. Ideal for fine garments like baby clothes, intricate lace work, and projects requiring durability and shape retention.
Practical Advice for Choosing Needle Size:
Always Check Your Pattern: Knitting patterns will always recommend a specific needle size to achieve the intended gauge. Starting with the recommended size is the best approach.
Knit a Swatch: This cannot be stressed enough! Before committing to a large project, knit a small swatch (e.g., 4×4 inches) using your chosen yarn and needles. Wash and block the swatch as you would the finished item. Measure your gauge and compare it to the pattern’s recommendation.
If your swatch has too many stitches per inch, your gauge is too tight. Go up one needle size.
If your swatch has too few stitches per inch, your gauge is too loose. Go down one needle size.
Consider Yarn Weight: Thicker yarns generally require larger needles, while finer yarns need smaller needles. However, personal preference and desired fabric drape also play a role.
Common Mistakes to Avoid:
Ignoring Gauge: Skipping the swatch can lead to a project that is too big, too small, or has the wrong drape.
Assuming All US Size 8 Needles Are the Same: While standardized, slight variations can exist between brands. Always check your gauge.
Sticking to One Size: Don’t be afraid to adjust your needle size. Even small changes can significantly impact your gauge and the final fabric.
Tip: Using the right needle size and material helps you control the tension and shape of your knitting. This skill is key to mastering knitting and improving your finished projects, ensuring they look professional and feel exactly as intended.
Essential Yarn Choices
Yarn choice affects the comfort, look, and durability of your project. You can pick from many fibers, such as cotton, acrylic, wool, and blends. Each type has its own strengths and best uses.
Cotton Yarn | Acrylic Yarn | |
|---|---|---|
Durability | Good strength but may shrink and lose shape when washed | High wear resistance; keeps shape after washing |
Weight | Heavier, can sag in large projects | Lighter, good for big designs |
Moisture Management | Absorbent, cool for warm weather | Less absorbent, warmer for cold weather |
Stitch Definition | Smooth, good for details, may split | Can mask stitch details |
Care and Maintenance | Machine washable, needs careful handling | Machine washable, easy care |
Cost | Usually more expensive | More affordable |
Suitable Projects | Baby clothes, summer items, dishcloths | Blankets, winter wear, durable items |
Plant fiber yarns, like cotton and bamboo, feel soft and work well for baby items and summer tops. These yarns can be harder to knit because they stretch less and show tension mistakes. Blending plant fibers with wool adds stretch and makes knitting easier. Wool yarns are warm and stretchy, great for winter hats and scarves. Acrylic yarns are budget-friendly and easy to care for, making them a good choice for beginners.
Note: Mastering knitting basics includes learning how different yarns behave. This knowledge helps you pick the best yarn for each project.
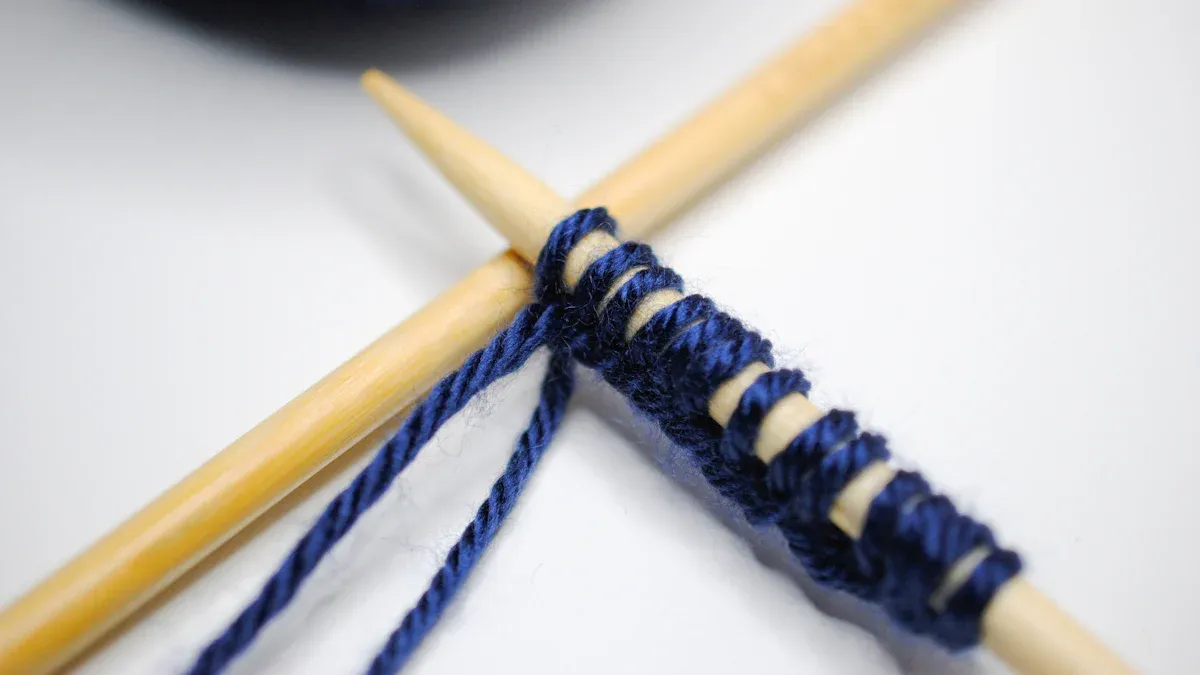
Cast-On Methods
The cast-on is the very first row of stitches you create, forming the foundation of your knitting. A neat and appropriate cast-on edge is essential for a polished look and can significantly impact the overall structure and aesthetic of your finished project. This is especially true for items like chunky knit blankets, where the edge is a prominent feature.
The Long-Tail Cast-On: A Beginner-Friendly Essential
The long-tail cast-on is a popular and versatile method, particularly favored by beginners due to its ease of learning and the neat, elastic edge it creates.
Step-by-Step Guide for the Long-Tail Cast-On:
Measure Your Tail: Estimate a length of yarn about three times the desired width of your finished project. This will be your “tail.” For larger projects, you might need to estimate more generously or start with a larger hank of yarn.
Make a Slip Knot: Create a slip knot and place it on one of your knitting needles. This counts as your first stitch.
Prepare Your Hands: Hold the needle with the slip knot in your right hand. Use your left hand to hold the yarn, with the tail end draped over your left thumb and the working yarn (coming from the yarn ball) draped over your left index finger. Secure both strands against your palm with your remaining fingers.
Form the First Loop (Thumb): Bring the needle under the yarn on your thumb from the front.
Form the Second Loop (Finger): Then, bring the needle over the working yarn on your index finger from the back.
Pull Through: Pull the loop from your index finger through the loop on your thumb.
Tighten Gently: Remove your thumb from the loop and gently tighten the stitch on the needle. Do not pull too tightly, as this can make it difficult to knit the first row.
Repeat: Repeat steps 4 through 7 until you have the desired number of stitches on your needle.
Why a Neat Cast-On Edge Matters:
A well-executed cast-on edge provides a professional finish, preventing your blanket or scarf from looking messy or uneven. It also creates a stable foundation, making it much easier to pick up stitches later if you need to add a border, fix mistakes, or join pieces. Mastering your cast-on technique instills confidence and sets a strong precedent for all your future knitting projects.
Exploring Other Cast-On Methods and Their Applications
While the long-tail cast-on is excellent, exploring other methods will broaden your knitting repertoire and allow you to choose the perfect start for any project.
Knitted Cast-On:
Description: Creates a firm, sturdy edge similar to a regular knitted row. It’s easy to learn once you know how to knit.
Best For: Projects requiring a strong, non-stretchy edge, such as ribbing, button bands, or when you need a less elastic beginning.
Comparison: Less elastic than the long-tail cast-on, but very stable.
Cable Cast-On:
Description: Produces a decorative, ropelike edge that is firm and durable. It’s created by knitting into the space between stitches rather than into the stitches themselves.
Best For: Necklines, cuffs, or any edge where a defined, decorative finish is desired. It’s often used when adding stitches in the middle of a project.
Comparison: Firmer and more structured than the long-tail, with a more pronounced edge.
Provisional Cast-On:
Description: Creates a temporary row of stitches that can be unraveled later, allowing you to knit in the opposite direction or graft stitches seamlessly. Often uses waste yarn and a crochet hook.
Best For: Scarves or cowls knit in the round from the center, joining two pieces seamlessly, or creating a reversible edge.
Comparison: Unlike other methods, it doesn’t create a permanent edge, offering flexibility for later manipulation.
Practical Tips for Choosing the Right Cast-On:
Consider Elasticity: Does your project need a stretchy edge (e.g., socks, hats) or a firm one (e.g., dishcloths, sturdy bags)?
Edge Appearance: Do you want a decorative edge (cable cast-on) or a simple, clean one (long-tail, knitted)?
Project Function: Will you need to pick up stitches later or join pieces seamlessly? A provisional cast-on might be ideal.
Recommended Resources for Learning Cast-On Methods:
Online Tutorials: Websites like “KnittingHelp.com” and “VeryPink Knits” offer clear, free video tutorials for a wide variety of cast-on methods. Simply search for the specific cast-on you’re interested in.
Knitting Books: Classics like “Knitting Without Tears” by Elizabeth Zimmermann provide excellent illustrated instructions for foundational techniques. Modern knitting encyclopedias are also great resources.
Local Yarn Shops (LYS): Many LYS offer beginner knitting classes where you can get hands-on instruction and personalized advice.
Tip: Practice makes perfect! Don’t be afraid to try different cast-on methods on swatches to see how they look and feel with your chosen yarn and needles. Mastering various cast-on techniques adds a professional touch to your finished projects and significantly expands your knitting capabilities.
Garter Stitch and Basic Patterns
Garter stitch is one of the first patterns you will learn when mastering knitting. You knit every row, which creates a fabric that lies flat and feels stretchy. This stitch works well for scarves, blankets, hats, and baby clothes.
Aspect | Garter Stitch | Stockinette Stitch | Ribbing |
|---|---|---|---|
Technique | Knit every row | Alternate knit and purl rows | Alternate knit and purl stitches in same row |
Fabric Texture | Reversible, lies flat, stretchy | Smooth on one side, bumpy on the other, curls at edges | Vertical ridges, very stretchy, snug fit |
Edge Behavior | Does not curl, lies flat | Curls at edges | Edges lie flat but fabric is snug |
Elasticity | Moderate stretch | Less stretchy | Highly elastic |
Project Suitability | Scarves, blankets, hats, baby clothes | Garments needing smooth texture | Cuffs, hems, snug-fitting areas |
Learning Difficulty | Easy, suitable for beginners | Moderate, requires purl stitch | Moderate, requires stitch switching |
Garter stitch uses worsted-weight yarn with US size 8 needles for about 4 to 4.5 stitches per inch. The fabric feels thick and bouncy, with ridges that add warmth and strength. You can use garter stitch alone or mix it with other patterns for more complex designs.
Garter stitch is easy to learn and only needs the knit stitch.
The fabric lies flat and looks the same on both sides.
It stretches enough to make your projects comfortable and flexible.
You can use garter stitch for both simple and advanced projects.
Mastering knitting basics, such as garter stitch, helps you build confidence. Many knitters find that starting with simple projects like dishcloths improves their tension control and skill. As you practice, you will notice your projects look neater and more professional. Some knitters even finish complex items, like socks, in just a few days after mastering the basics.
If you want to learn more, check out “Knitting Without Tears” or search for free online tutorials. These resources guide you through each step and help you avoid common mistakes.
Chunky Knit Blankets
Big Needles and Fast Progress
You can create chunky knit blankets quickly by using big needles. Needles in sizes US 15, 17, or even 50 help you make large, soft stitches. These big needles hold thick yarn and let you see your progress after just a few rows. You will notice that your blanket grows fast, which keeps you motivated. Many knitters enjoy the instant results that chunky projects provide.
Tip: Choose smooth, lightweight needles. They help you move thick yarn easily and reduce hand fatigue.
Cast-On for Chunky Projects
A strong and neat cast-on edge is important for chunky blankets. The long-tail cast-on works well because it creates a stretchy and even edge. You should leave a long enough tail to avoid running out of yarn before you finish casting on. Try to keep your stitches loose so the edge does not pull tight. This helps your blanket lay flat and look professional.
Garter Stitch for Texture
Garter stitch gives chunky blankets a cozy, textured look. You knit every row, which makes thick ridges that trap warmth. This stitch also keeps the edges from curling, so your blanket stays flat. You can use garter stitch alone or mix it with other patterns for extra interest. Many beginners start with garter stitch because it is easy to learn and forgiving of small mistakes.
Fixing Mistakes Early
You will make mistakes as you knit, but fixing them early leads to better results. Many experienced knitters share this advice:
Chloe always rips out even small mistakes, which makes her happier with her finished projects.
Denise Skinner learned to spot problems early after needing three tries to fix a yoke.
Sarah Ann Smith fixes cable mistakes by dropping down stitches, which helped her learn new skills.
Diana Foch became a braver knitter by correcting mistakes right away, even if it meant dropping a whole panel of stitches.
You build confidence and improve your knitting when you correct errors as soon as you see them.
Arm Knitting Basics
Arm knitting offers a fun way to make chunky blankets without needles. You use your arms as giant knitting needles. This method works best with super bulky yarn. You can finish a small blanket in just a few hours. Arm knitting creates large, open stitches and a soft, modern look. If you want a quick project or do not have big needles, try arm knitting for your next blanket.
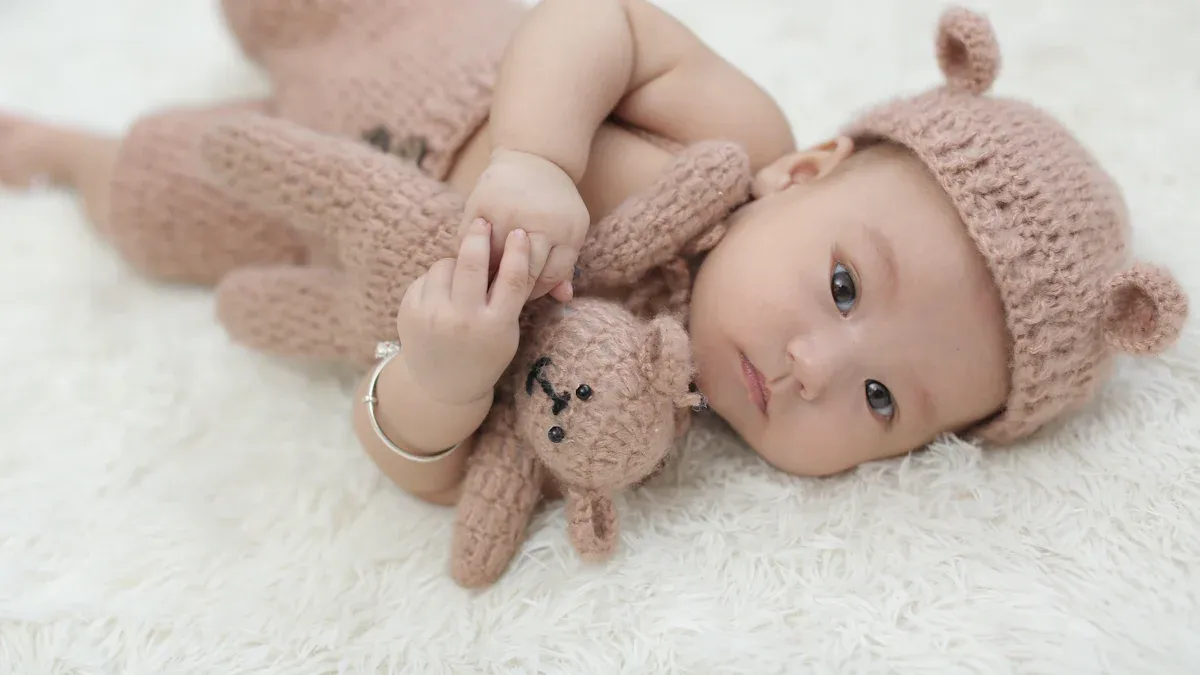
Baby Knit Clothes
Soft Fibers for Baby Knits
You want baby clothes to feel soft and gentle against delicate skin. Fine wool fibers, such as merino wool, work well because they have thin, smooth strands that do not itch. Merino wool stays soft after many washes and resists dust mites and allergens. This fiber also wicks moisture away, keeping babies dry and comfortable. Certified organic wool ensures no harsh chemicals touch your baby’s skin. Bamboo yarn is another excellent choice. It absorbs sweat quickly and dries fast, which helps prevent rashes. Bamboo is naturally hypoallergenic and reduces skin redness. Pediatric experts recommend bamboo for its softness and ability to manage moisture. Many families notice fewer skin problems when they use bamboo baby clothes.
Small Needles and DPNs
You need small needles to create tight, neat stitches for baby garments. Double-pointed needles (DPNs) help you knit small, round pieces like sleeves, socks, and hats without seams. DPNs let you work in the round on tiny projects that circular needles cannot handle. This seamless method makes baby clothes more comfortable and prevents rough edges. Always check your pattern for the right needle size. Make a small swatch to test your gauge and adjust your needle size if needed. This step ensures your finished garment fits well and feels soft.
Knitting in the Round
Knitting in the round lets you create tubes without seams. You use DPNs or small circular needles for hats, sleeves, and booties. This technique gives baby clothes a smooth finish and avoids bulky seams that could irritate sensitive skin. When you knit in the round, you also save time because you do not need to sew pieces together.
Shaping with Short Rows
Short rows help you shape baby garments with smooth curves. Instead of binding off stitches and creating steps, you knit to a certain point, wrap the yarn, and turn your work. This method forms gentle slopes for shoulders and necklines. The table below shows how short rows compare to traditional shaping:
Aspect | Traditional Method | Short Row Method |
|---|---|---|
Shoulder shaping | Stepped edges | Smooth curves |
Neck shaping | Center bind-off | Curved, seamless dip |
Stitch handling | Bound off, then seamed | Live stitches, seamless |
Resulting shape | Flat, stepped | Three-dimensional curve |
Short rows make baby clothes fit better and look more professional.
Washing and Care Tips
Proper care keeps baby knits soft and long-lasting. Always check the care label before washing. Wash baby knits on a gentle or wool cycle with cold water. Separate colors to prevent fading. Avoid over-washing to keep fibers strong. Air dry your knits instead of using a dryer to prevent shrinking. Fold baby clothes for storage to avoid stretching. Store them in a dry place, and use cedar or lavender to keep moths away. Wool and bamboo resist odors and bacteria, so you do not need to wash them as often. These steps help your handmade baby clothes stay beautiful and comfortable.
Advanced Skills & Resources
Short Rows and Shaping
You can take your knitting to the next level by learning advanced shaping techniques. Short rows let you add curves and angles to your projects. You use them to shape shoulders, necklines, and even the toes of socks. Many expert knitters also use multi-color methods like Jacquard and intarsia to create bold patterns. Some communities now explore 3D and seamless knitting, smart textiles, and even AI-generated patterns. These new skills blend tradition with technology, giving you more creative options.
Tip: Try two-handed stranding for colorwork. This method saves time and keeps your yarns from tangling.
Finishing Techniques
Professional finishing makes your projects look polished and last longer. You want to use invisible seams, neat ends, and strong joins. The table below shows how different finishing techniques improve quality and durability:
Construction Element | Technique/Quality Indicator | Impact on Quality and Longevity |
|---|---|---|
Stitch Consistency | Even stitches, good tension | Smooth, durable fabric |
Seams and Joining | Mattress stitch, invisible seams | Soft, flat joins that resist wear |
Hem and Cuff Construction | Double-folded hems, elastic ribbing | Prevents curling, keeps shape |
Buttons and Closures | Reinforced, neat buttonholes | Durable and functional |
You should always weave in ends carefully and block your finished piece. Blocking shapes your project and smooths out stitches. These steps help your knits keep their shape and look professional.
Free Patterns and Tutorials
You can find many free patterns and tutorials online. Websites, blogs, and video channels offer step-by-step guides for all skill levels. Many experienced knitters praise clear tutorials and videos for helping them master advanced techniques. Machine knitting courses and digital tools also help you learn faster. These resources give you inspiration and confidence to try new projects.
Ravelry, Knitty, and YouTube host thousands of free patterns.
Many knitting blogs share tips, troubleshooting guides, and stitch libraries.
Online communities often post video tutorials for complex skills.
Community and Books
Joining a knitting group or reading trusted books gives you more than just patterns. You gain support, inspiration, and a sense of belonging. Surveys show that most knitters feel happier and less stressed when they knit, especially in groups. Many people use knitting to boost their mood and reduce anxiety. Reading books and joining groups also helps keep your mind sharp and gives you new ideas.
Note: Knitting groups and books like “The Relaxation Response” by Dr. Herbert Benson show that knitting can lower stress and improve your well-being. You can find both social and health benefits by connecting with others who share your passion.
You have explored the journey from learning basic stitches to creating advanced projects like chunky blankets and baby clothes. Mastering Knitting comes from practicing new techniques and trying different patterns. Experts say your skills grow when you take on a variety of projects and learn from mistakes. Free online resources and knitting groups help you keep learning and stay inspired. Each project brings new satisfaction and lets your creativity shine. 🧶
FAQ
What needles work best for beginners?
You should start with medium-sized needles, like US size 8 (5mm). These needles feel comfortable and help you see your stitches clearly. Wooden or bamboo needles grip yarn better, so your stitches do not slip off easily.
How do you fix a dropped stitch?
Use a crochet hook to pull the dropped stitch back up through each row. Place the stitch back on your needle. If you catch it early, your project will look neat.
Tip: Practice on a small swatch before fixing your main project.
Can you mix yarn types in one project?
You can mix yarns, but choose yarns with similar weight and care instructions. Mixing very different fibers can change the look and feel of your project.
Yarn Type | Wash Temp | Stretch |
|---|---|---|
Wool | Cold | High |
Cotton | Warm | Low |
How do you keep edges from curling?
Use garter stitch or ribbing at the edges. These stitches help your project lie flat. Blocking your finished piece with water and pins also helps keep the edges smooth.


