You might wonder whether flat knitting or working in the round gives you a better stockinette stitch. The truth is, the best way depends on what you want to make and how you like to knit. Both methods have their own strengths. Some knitters love the rhythm of flat pieces, while others enjoy making seamless tubes. Take a look at this table to see which projects people often choose for each method:
Knitting Method | Common Project Types |
|---|---|
Flat knitting | Scarves, blankets, afghans, sweater parts |
Circular knitting | Hats, socks, mittens, sleeves, seamless sweaters |
Think about your comfort and the type of item you want before you knit stockinette stitch in the round or flat.
Key Takeaways
Flat knitting means you switch between knit and purl rows. It makes flat things like scarves and blankets. You need to sew the pieces together at the end. The edges can curl up when you knit flat.
Knitting in the round is when you knit in a circle. This makes tubes with no seams, like hats and socks. It is often faster and feels smoother.
Beginners might think knitting in the round is easier. You only use knit stitches for this method. Flat knitting needs you to learn both knit and purl stitches. You also have to turn your work each row.
Stockinette stitch curls at the edges. You can add borders like ribbing or garter stitch to help. Blocking your project also helps keep it flat and tidy.
You should pick flat or in-the-round based on your project. Think about what you like and how you want it to look. Try both ways with small practice pieces to see which you like best.
Quick Comparison
Main Differences
When you look at flat knitting and in-the-round knitting, you notice some big differences right away. Here’s what stands out:
Flat knitting means you switch between knit and purl rows. You turn your work after each row. This creates a flat piece of fabric.
In-the-round knitting lets you knit every round without turning your work. You make a tube, which is great for hats or sleeves.
With flat knitting, you see both the right and wrong sides as you work. In-the-round knitting always shows you the right side.
The stitch pattern looks similar, but the way the stitches lock together changes. In-the-round fabric often feels smoother and curls more at the edges.
If you want to make garter stitch, you knit every row flat. In the round, you have to purl every other round to get the same look.
Knitting in the round can be faster. You skip purl rows and turning, so you finish your project sooner.
Tip: If you want a tighter gauge when knitting in the round, you might need to use a bigger needle size than you would for flat knitting.
Summary Table
Feature | Flat Knitting | In-the-Round Knitting |
|---|---|---|
How you work | Alternate knit and purl rows | Knit every round |
Turning the work | Yes, after every row | No, you keep going in a circle |
Sides visible | Both right and wrong sides | Only right side |
Speed | Slower (includes purling, turning) | Faster (just knitting) |
Gauge | Looser, may need smaller needles | Tighter, may need larger needles |
Best for | Scarves, blankets, panels | Hats, socks, sleeves, seamless items |
You can see that each method has its own strengths. Think about your project and what feels best in your hands before you choose.
Ease of Knitting
Learning Curve
When you start learning stockinette stitch, you might notice that flat and in-the-round knitting feel very different. Flat knitting asks you to switch between knit and purl rows. This means you need to learn both stitches and remember to turn your work after each row. Many beginners find it tricky to keep their tension even. Sometimes, the fabric looks bumpy or uneven because the purl rows feel different from the knit rows. You might also see the edges curl up, which can be frustrating. To stop the curling, you need to add special border stitches like ribbing or garter stitch. This adds another step to your project.
Knitting in the round feels simpler for many people. You only use the knit stitch, so you do not have to worry about purling or turning your work. The fabric usually looks smoother and more even. You can see your progress as you go, which feels rewarding. However, you need to learn how to use circular needles or double-pointed needles. These tools can feel awkward at first, especially when working on small projects like socks or sleeves. Some people find it hard to keep the stitches from slipping off or to avoid gaps between needles.
Tip: If you want a smooth start, try practicing both methods with a small swatch. You will quickly see which one feels better in your hands.
Managing Stitches
Handling a lot of stitches can feel overwhelming, but the right tools make it easier. Here’s a quick look at how each method helps you manage your stitches:
Aspect | Flat Knitting | In-the-Round Knitting |
|---|---|---|
Straight or single pointed needles | Circular needles, DPNs, or magic loop | |
Stitch Handling | Work back and forth, turning rows | Knit continuously in a circle |
Comfort & Control | Good for large pieces, easy to turn | Great for seamless tubes, but can feel fiddly |
Challenges | Seaming needed, edges can curl | Gaps between needles, learning new techniques |
Best Use | Scarves, panels, blankets | Hats, sleeves, socks, seamless sweaters |
Flat knitting works well for big projects like blankets or sweater panels. You can spread out your stitches and see each row clearly. You do need to seam the pieces together at the end, which some people find hard. In-the-round knitting lets you make tubes without seams. You keep all your stitches on the needles, but you might need to watch out for gaps or “ladders” between needles, especially when using double-pointed needles.
No matter which method you choose, you will get better with practice. Try both ways and see which one makes your knitting time more fun.
Knit Stockinette Stitch in the Round
Technique
When you knit stockinette stitch in the round, you get to enjoy a smooth and steady rhythm. You do not have to switch between knit and purl rows. Instead, you knit every stitch in every round. This makes working in the round feel easier and faster for many knitters.
Here’s how you can knit stockinette stitch in the round:
Cast on the number of stitches you need onto circular needles or double-pointed needles. Make sure you have enough stitches to fit around your needles.
Join your stitches in the round. Check that your stitches are not twisted before you connect them. Place a stitch marker at the start of your round so you always know where you began.
Knit every stitch in every round. You will always see the right side of your work facing you.
Keep knitting until your project reaches the length you want.
Bind off your stitches to finish.
You do not need to turn your work or worry about purling. This technique creates a tube of fabric, which is perfect for hats, socks, cowls, and seamless sweaters. Many knitters love making a pullover this way because you do not have to sew pieces together at the end. You get a smooth, professional look with no seams.
Tip: If you want your edges to lay flat, add a border of ribbing at the start and end of your project. Ribbing helps stop the fabric from curling.
Knitting in the round works best with circular needles. You can also use double-pointed needles for smaller projects like socks or mittens. If you want to make a pullover, circular needles give you plenty of space for all your stitches.
Tension and Gauge
Tension and gauge matter a lot when you knit in the round. You might notice your stitches look more even and your fabric feels smoother. This happens because you only use the knit stitch, so your hands move the same way for every stitch. Many knitters find their gauge is tighter when knitting in the round compared to flat knitting.
Let’s look at why this happens. When you knit stockinette stitch in the round, you do not have to switch between knit and purl stitches. Some people make looser purl stitches when knitting flat, which can make the fabric look uneven. In the round, you avoid this problem. Your stitches line up neatly, and your fabric has a nice, even texture.
Here are some things to keep in mind about tension and gauge when working in the round:
Your gauge may be tighter than when you knit flat. For example, with wool yarn, you might get 3.75 stitches per inch in the round, but only 3.687 stitches per inch when knitting flat. With cotton yarn, the difference can be even bigger.
The type of yarn you use changes how much you notice these differences. Wool and wool blends hide small mistakes because they are stretchy and fuzzy. Cotton and linen show every detail, so your stitches need to be even.
The size of your circular needles and the number of stitches you have can also change your gauge. Smaller projects, like socks, often come out tighter than bigger ones.
Always knit a swatch in the round before you start your project. This helps you check your gauge and avoid surprises later.
Note: If you see stripes or uneven rows on the purl side of your fabric, it means your tension is not even. Swatching in the round helps you spot this before you start a big project.
Many projects benefit from knitting in the round. Hats, socks, mittens, cowls, and seamless sweaters all look great with this method. If you want to make a pullover, working in the round lets you try it on as you go. You can check the fit and make changes before you finish.
Some beginners make mistakes when they knit stockinette stitch in the round. You might twist your stitches when joining, or use the wrong needle size. Sometimes, you forget to check your gauge, and your pullover comes out too big or too small. Always take your time when setting up your project. Place your stitch marker, check your stitches, and knit a swatch first.
Knitting in the round with circular needles opens up many options. You can make seamless garments, save time, and enjoy a smooth, even fabric. Once you get the hang of it, you might find yourself reaching for your circular needles every time you start a new pullover or hat.
Flat Knitting
Technique
When you start working flat, you create stockinette stitch by switching between two simple steps. On the right side, you knit every stitch. On the wrong side, you purl every stitch. You keep repeating these two rows. This back-and-forth motion gives you the classic V-shaped pattern that everyone recognizes in stockinette.
You knit all stitches on the right side (Row 1).
You purl all stitches on the wrong side (Row 2).
Repeat these two rows for the whole project.
This method makes a smooth fabric, but you will notice the edges curl up. That is just how stockinette works. Some knitters use this curl on purpose for rolled necks or cuffs. If you want your project to lie flat, you can add a border with a different stitch, like garter or ribbing.
Flat knitting is great for many projects. You can make scarves, blankets, and sweater pieces. You work each piece flat, then sew them together at the end. This gives you more control over the shape and size of your project.
Here is a quick look at common projects you can make by working flat:
Project Type | Use of Flat Stockinette Stitch | Edge Treatment / Notes |
|---|---|---|
Scarves | Often knit flat in stockinette stitch | Selvedge stitches help prevent curling; can be decorative |
Blankets | Commonly knit flat in stockinette stitch | Edges tend to curl; borders or other stitch patterns often added |
Sweaters (seamed) | Pieces knit flat in stockinette and then seamed | Selvedge stitches facilitate seaming and pattern continuity |
You will see that working flat is a popular choice for these items. Selvedge stitches help keep the edges neat and make it easier to sew pieces together.
Tip: If you want to avoid curling, try adding a few stitches of garter or seed stitch at each edge. This simple trick can make your project look more polished.
Purl Rows
When you are working flat, you need to purl every other row. Some knitters find purling less comfortable than knitting. Your hands move differently, and it can feel slower. You might notice that your tension changes between knit and purl rows. This can make your fabric look uneven, with some rows tighter or looser than others.
If you want your stockinette stitch to look smooth, pay attention to your purl rows. Practice helps you keep your tension even. Some people find that using slightly smaller needles for purl rows helps, but most knitters just need a little time to get used to the motion.
Working flat also means you see both the right and wrong sides of your project. You can spot mistakes quickly and fix them before you go too far. When you finish, you will need to seam the pieces together. Mattress stitch is a popular way to join flat pieces. It makes a strong, almost invisible seam, which is perfect for sweaters and sleeves.
You might wonder why so many people choose working flat for scarves and blankets. The answer is simple: you can make large, flat pieces without worrying about fitting them around a circular needle. You can also add fancy borders or mix in other stitch patterns to keep things interesting.
Note: Stockinette stitch curls at the edges, so many knitters add borders or use special stitches to keep their projects flat. If you like the curled look, you can let the edges roll for a fun, casual style.
Working flat gives you lots of options. You can make anything from a cozy scarf to a big blanket or a classic sweater. You just need to remember to alternate knit and purl rows, watch your tension, and plan for seaming at the end.
Fabric Appearance
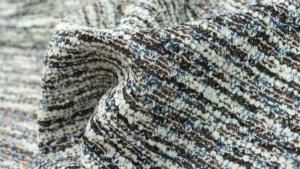
Texture
When you look at stockinette stitch, you see a smooth side and a bumpy side. The smooth side, called the “right side,” shows neat V-shaped stitches. The “wrong side” looks like rows of tiny bumps. If you knit flat, you flip your work back and forth, so you see both sides as you go. When you knit in the round, you always see the right side facing you. This makes it easier to spot mistakes and enjoy the even texture as you work.
The texture can feel different depending on your method. In-the-round projects often look a bit smoother because you only use the knit stitch. Flat projects might show small changes in tension between knit and purl rows. If you want a super-even look, try to keep your tension steady, especially on purl rows. Some yarns, like cotton, show every detail, while wool can hide small bumps.
Tip: If you want a polished look, use a yarn that matches your skill level. Wool is forgiving, while cotton and linen show every stitch.
Curling
Stockinette stitch loves to curl at the edges. This happens because of the way the stitches pull on each other. The front of each stitch is bigger than the back, so the fabric wants to roll toward the smooth side. Tighter stitches curl more because they hold extra tension. Looser stitches curl less, but the fabric might feel floppy.
Here are some reasons why curling happens and how your method changes it:
The shape and tension of knit stitches make the fabric curl at the edges.
Tighter stitches increase curling, while looser stitches help reduce it.
Flat projects have free edges on the sides, so you see curling along both the sides and ends.
In-the-round projects form a tube, so the sides are joined and can’t curl. Only the ends might curl.
Adding borders like ribbing, garter, or seed stitch helps stop curling by balancing the forces in the fabric.
Blocking helps flatten your project. Wet blocking means soaking your piece, pinning it flat, and letting it dry. Steam blocking uses steam to relax the stitches. Both methods help, but curling can return after washing.
Note: If you want a flat project, always add a border and block your work. For scarves or blankets, this makes a big difference!
Finishing
Seaming
When you finish a flat-knit project, you often need to join pieces together. This is where seaming comes in. The most popular way to seam stockinette stitch is the mattress stitch. You will love this method because it makes your seam almost invisible from the right side. Your sweater sides or sleeves will look like one smooth piece.
To use mattress stitch, lay your pieces right side up. Thread a yarn needle with yarn that matches your project. Find the horizontal bars between the first and second stitches along each edge. Sew under these bars, switching from one piece to the other. Gently pull the yarn as you go. The seam will close up neatly and stay strong.
Sometimes, the edges of your stockinette pieces curl, which makes seaming tricky. You can fix this by tacking the edges with a contrasting yarn every few rows. This holds the fabric flat and helps you line up the rows. As you work the mattress stitch, remove the tacking yarn. This trick keeps your seam straight and saves you frustration.
Tip: Mattress stitch works best for vertical seams, like the sides of sweaters or sleeves. You only need a yarn needle and some matching yarn.
Weaving Ends
Every knitting project leaves you with yarn tails to weave in. The way you handle these ends depends on how you knit your project.
If you knit flat, you have seams and a clear wrong side. You can weave your ends into the diagonal purl bumps on the wrong side. Change direction halfway through to lock the yarn in place. Avoid weaving straight up or across, as this can show on the right side or make the fabric pucker. Seams give you a great spot to hide your ends.
When you knit in the round, you get a seamless tube. You see only the right side, so you need to be careful where you weave in your ends. Try to join new yarn in less visible spots, like under the arm of a sweater. You will have fewer ends to deal with, but you must make sure they stay hidden and do not poke out.
For flat projects: Weave ends on the wrong side, use seams to hide them, and change direction for security.
For in-the-round projects: Weave ends in hidden spots, check from the right side, and leave a short tail after trimming.
Always check your work from the right side. You want your finishing to look neat and feel comfortable to wear.
Project Suitability
Best Uses for Each Method
You might wonder when to pick knitting in the round or working flat. Each method shines with certain projects. If you want to make a scarf, a blanket, or panels for a sweater, working flat is your best friend. You knit back and forth, which makes it easy to handle big, flat pieces. Scarves and blankets look great with this method, and you can add borders to stop the edges from curling.
Knitting in the round works best for projects shaped like tubes. Think about hats, socks, sleeves, or a seamless pullover. You use circular needles to knit every stitch, so you never have to turn your work. This method helps you finish faster and gives you a smooth, even fabric. Many knitters love making a pullover in the round because you can try it on as you go and check the fit.
Here’s a quick table to help you decide:
Project Type | Best Method | Why It Works Well |
|---|---|---|
Scarf | Working flat | Easy to knit back and forth |
Blanket | Working flat | Handles large, flat shapes |
Hat | Knitting in the round | Seamless, stretchy, fits any head |
Socks | Knitting in the round | No seams, fits snugly |
Pullover (seamless) | Knitting in the round | Try on as you go, fewer seams |
Pullover (seamed) | Working flat | Good for structure and shaping |
Tip: If you want a classic pullover with strong seams, working flat gives you more support. If you want a comfy, seamless pullover, knitting in the round is the way to go.
Combining Methods
Sometimes, you get the best results by mixing both methods in one project. Many knitters use knitting in the round for the body of a pullover and switch to working flat for the shoulders or neckline. This combo lets you enjoy the smooth, even fabric from working in the round and the shaping options from working flat.
You can knit the lower body and sleeves of a pullover in the round for comfort and speed.
When you reach the upper body or shoulders, switch to working flat. This helps you shape the neckline or add set-in sleeves.
Some sweaters need seams for extra support, especially if you use yarn that stretches. Seams help your pullover keep its shape.
You can even add faux seams or basting stitches to get the look and support of seams without sewing pieces together.
Working in the round with circular needles makes the main part of your pullover easy and seamless. When you need to shape the neck or shoulders, working flat gives you more control. This hybrid style lets you try on your pullover as you knit, so you get the perfect fit. You also spend less time seaming at the end.
Note: If you want a pullover that fits well and keeps its shape, try combining both methods. You get the best of both worlds—smooth knitting and strong structure.
Tips for Choosing
Comfort
When you pick a knitting method, comfort matters a lot. You want your hands to feel good while you work. Some knitters love the steady back-and-forth of flat knitting. You get to rest your hands at the end of each row. Straight needles feel familiar and easy to hold. If you like to see both sides of your project as you go, flat knitting gives you that view.
Other knitters prefer the smooth flow of knitting in the round. You never have to turn your work. You just keep knitting, and the project grows like magic. Circular needles can feel lighter because they hold the weight of your project in your lap. This helps if your hands or wrists get tired easily.
Here are a few things to think about:
Do you like to knit only with the knit stitch? Try knitting in the round.
Do you enjoy switching between knit and purl? Flat knitting might suit you.
Do your hands get sore with heavy projects? Circular needles spread out the weight.
Do you want to take breaks often? Flat knitting gives you a natural stopping point at the end of each row.
Tip: Try both methods with a small swatch. See which one feels better for your hands and your style.
Finished Look
The way you knit changes how your project looks in the end. Stockinette stitch in the round often looks smoother and more even. You only use the knit stitch, so your tension stays steady. This makes hats, socks, and seamless sweaters look neat and professional.
Flat knitting can show small changes between your knit and purl rows. Sometimes, you see lines or bumps where your tension shifts. This is normal and gets better with practice. Flat pieces also have edges that curl more, so you may need to add a border.
Here’s a quick table to help you compare:
Method | Look of Fabric | Curling | Seams Needed? |
|---|---|---|---|
In the round | Smooth, even texture | Ends may curl | No |
Flat knitting | May show row changes | Sides and ends | Yes |
Note: If you want a super-smooth finish, knitting in the round is a great choice. If you like classic shapes and don’t mind seaming, flat knitting works well.
You have lots of options when you knit stockinette stitch. Both flat and in-the-round methods offer unique benefits. Check out this quick table to see what experts say:
Method | Best For | Drawback |
|---|---|---|
In the round | Seamless, fast, smooth fabric | Can be tricky to join |
Flat knitting | Structure, easy for beginners | Needs seaming |
Many knitters wonder about needle types, fabric sides, and finishing steps. Try both ways and see which one feels right for you. Have a favorite? Share your thoughts or questions below! 😊
FAQ
Can I switch from flat knitting to knitting in the round in the same project?
Yes, you can! Many sweaters use both methods. You might knit the body in the round, then switch to flat for the shoulders. Just remember to check your gauge when you change methods.
Why does my stockinette stitch curl so much?
Stockinette stitch curls because of how the stitches pull on each other. You can add a border, like garter or ribbing, to help stop the curling. Blocking your finished piece also helps flatten the edges.
Do I need special needles for knitting in the round?
You do. You need circular needles or double-pointed needles for knitting in the round. These tools help you join your stitches into a tube. For flat knitting, you can use straight needles.
How do I keep my tension even between knit and purl rows?
Practice helps a lot. Try to relax your hands and keep your yarn moving smoothly. Some knitters find it easier to use a slightly smaller needle for purl rows. Swatching before your project can show you where your tension changes.